BusinessObjects Enterprise Administrator's Guide

Adding a server

These steps add a new instance of a server to the local machine. You can run multiple instances of the same BusinessObjects Enterprise server on the same machine.

To add a Windows server

Note:    To complete this procedure, you must log on as an Administrator of the local machine.

  1. Start the CCM on the BusinessObjects Enterprise machine upon which you want to install a new server.
  2.  On the toolbar, click Add Server.
  3. The Add Business Objects Server Wizard displays its Welcome dialog box.

  4. Click Next.
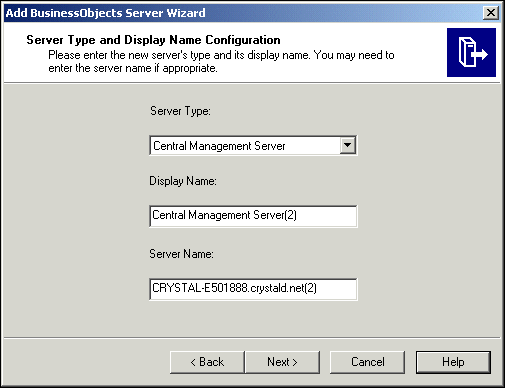
  5. The "Server Type and Display Name Configuration" dialog box appears

    . 

  6. Click the Server Type list and select the kind of server you want to add.
  7. Change the default Display Name field if you want a different name to appear in the list of servers in the CCM.
  8. Note:    The display name for each server on the local machine must be unique.

  9. Change the default Server Name field if required.
  10. Each server on the system must have a unique name. The default naming convention is HOSTNAME.servertype (a number is appended if there is more than one server of the same type on the same host machine). This Server Name is displayed when you manage servers over the Web in the Central Management Console (CMC).

    When you add Input or Output File Repository Servers, the wizard always precedes the server name you type with an "Input." or "Output." prefix. So, if you add an Input FRS with the name SERVER02, the CCM actually names the server Input.SERVER02. This "Input." prefix is required by the system. If you subsequently modify the server's name through its command line, do not remove the prefix.

  11. Click Next.
  12. The "Set Configuration for this server" dialog box appears. The contents of this dialog vary slightly, depending upon the type of server that you are installing.

  13. Type the name of the CMS that you want the server to communicate with.
  14. If your CMS is not listening on the default port (6400), include the appropriate port number, as in CMSname:port#

  15. Click Next to accept any other default values, or modify them to suit your environment.
  16. Note:    If port number options are displayed in this dialog box, do not modify them. Instead, change ports through each server's command line. For details, see "Changing the default server port numbers" on page 139.

  17. Confirm the summary information is correct; then click Finish.
  18. The new server appears in the list, but it is neither started nor enabled automatically.
  19. Use the CCM (or the CMC) to start and then to enable the new server when you want it to begin responding to BusinessObjects Enterprise requests. For details, see "Viewing and changing the status of servers" on page 84.

Tip:    Auditing in BusinessObjects Enterprise is enabled on a per server basis. If you add a new server to your BusinessObjects Enterprise installation you must enable auditing of actions on each new server. If you do not, the actions performed on the new server will not be audited. See the BusinessObjects Enterprise Auditor's Guide for more information.

To add a UNIX server

Use the serverconfig.sh script. For reference, see the BusinessObjects Enterprise Administrator's Reference Guide.


Business Objects
http://www.businessobjects.com/
Support services
http://www.businessobjects.com/services/support/
Product Documentation on the Web
http://support.businessobjects.com/documentation/